服务器配置LDAP显示mysql数据库数据
通过MobaXterm进入服务器,安装docker
卸载老版本
sudo apt-get remove docker docker-engine docker-ce docker.io |
添加秘钥
curl -fsSL http://mirrors.aliyun.com/docker-ce/linux/ubuntu/gpg | sudo apt-key add - |
设置存储库
sudo add-apt-repository "deb [arch=amd64] http://mirrors.aliyun.com/docker-ce/linux/ubuntu $(lsb_release -cs) stable" |
安装
sudo apt-get update |
查看版本
sudo docker version |
查看状态
systemctl status docker |
启动docker
sudo systemctl start docker |
设置开机启动(可选)
sudo systemctl enable docker |
demo验证(可选)
sudo docker run hello-world |
进入容器(可选)
docker run -it ubuntu bash |
清空(可选)
docker system prune |
换源
#使用阿里云镜像加速器 上下方法选择其中一个 |
#源二 |
填入下面内容
{ |
重启docker和deamon
(base) win10@win10:~$ sudo systemctl daemon-reload |
doker-compose安装
sudo apt install docker-compose |
yml创建ldap-mysql
选定路径创建yml文件
(base) win10@win10:~$ mkdir ldap |
(base) win10@win10:~$ vim /home/win10/ldap/compose.yml |
填写内容如下
version: '2' |
进入刚刚创建文件的路径下
(base) win10@win10:~$ cd /home/win10/ldap/ |
运行一下命令创建环境
(base) win10@win10:~/ldap$ sudo docker-compose up |
如果报错下面
ERROR: for ldap Cannot start service ldap: driver failed programming external connectivity on endpoint ldap_ldap_1 (40c178b3b4e3 66905e743a9b9919edf1ad13ece57071014e8fdaf96f148db187): Error starting userland proxy: listen tcp4 0.0.0.0:389: bind: address alre ady in use |
说明389端口被占用,查看已有docker
sudo docker ps |
停止运行该docker并删除该docker,如果NAMES不行就改成CONTAINER ID
sudo docker stop ldap_db_1 |
如果没有报错,则直接跳过上面两步
重新创建环境,新版本的compose up命令如下
(base) win10@win10:~/ldap$ sudo docker compose up -d |
如果还是报端口占用错误,查看端口所在进程
(base) win10@win10:~/ldap$ sudo lsof -i :389 |
杀死这个进程
(base) win10@win10:~/ldap$ sudo kill -9 3966705 |
然后重新运行,这个命令可以不显示运行过程
(base) win10@win10:~/ldap$ sudo docker compose up -d |
另外开一个服务器窗口,进入compose.yml所在文件夹
运行进入 ldap container:
(base) win10@win10:~$ cd /home/win10/ldap/ |
运行搜索示例
ldapsearch -x -h localhost -b dc=ldap,dc=vives,dc=be -D "cn=admin,dc=ldap,dc=vives,dc=be" -w ldap |
配置网页端PhpLdapAdmin
在ldap所在服务器上打开下面网页登陆
https://localhost:6443 |
允许远程mysql连接
进入mysql容器
在服务器再开一个窗口,此处容器名字是mysql所对应的
(base) win10@win10:~$ cd /home/win10/ldap/ |
进入mysql
密码为ldap
mysql -uroot -p |
修改权限
此处不用修改代码
ALTER USER 'root'@'%' IDENTIFIED WITH mysql_native_password BY '123456'; ### 123456 mysql的登录密码flush privileges; |
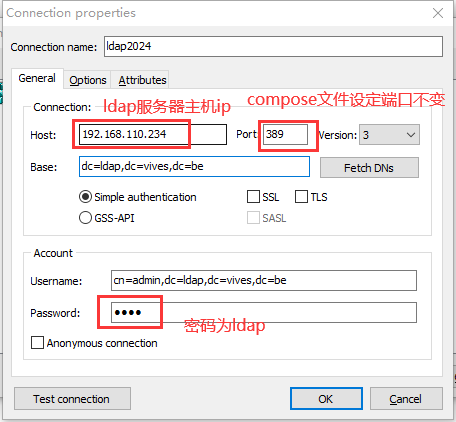
连接软件LDAP Admin
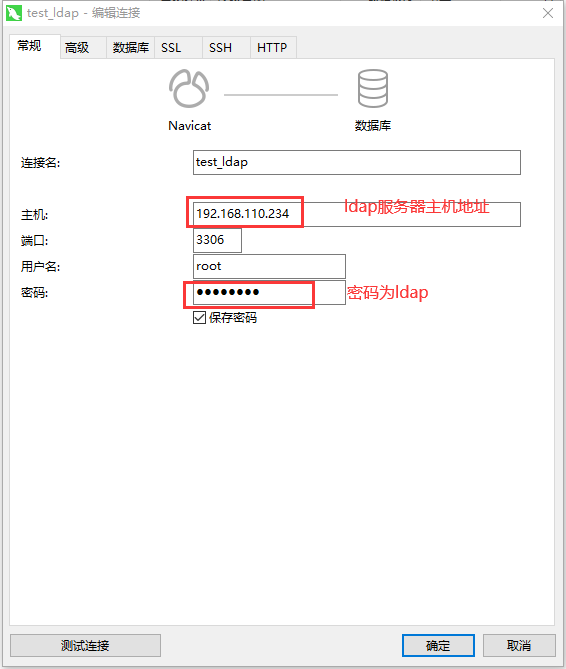
连接软件Navicat
给LDAP导入自定义的schema
因为ldap中只有部分属性名,不满足我们自己数据多样化需求,所以需要针对我们自己的数据创建新的属性名导入。
修改mysql数据库文件
ldap中属性名不支持下划线,而且需要唯一标识,所以先将我们从navicat导出的txt文件进行修改,py文件代码如下,其中路径需要对应修改
import os |
批量生成schema文件
分别添加包含数据表名和列名的schema,py文件内容如下
import pandas as pd |
批量运行的sh文件内容如下
#!/bin/bash |
将生成的schema文件夹复制到/var/lib/ldap/路径
(base) win10@win10:~$ sudo cp -r /home/win10/ldap/schema /home/win10/ldap/.data/var/lib/ldap/ |
生成导入schema的config文件
import os |
将生成的1.conf文件复制到/var/lib/ldap/路径
(base) win10@win10:~$ sudo cp -r /home/win10/ldap/1.conf /home/win10/ldap/.data/var/lib/ldap/ |
使用命令slaptest -f 1.conf -F ./;将会在当前目录生成一个./cn=config/cn=schema子目录,里面是每一个schema对应的ldif文件
root@vivesdata:/var/lib/ldap# slaptest -f 1.conf -F ./ |
针对每一个ldif文件,修改两行,将xxx修改为指定的objectClass名(比如ExtraNode``这种,就是对应``schema``的文件名),这里cn都填表名
dn: cn=xxx,cn=schema,cn=config //第3行 |
以下是批量修改的代码py
import re |
将修改后的cn=schema替换原来的
(base) win10@win10:~$ sudo rm -r /home/win10/ldap/.data/var/lib/ldap/cn\=config/cn=schema |
进入cn=config/cn=schema路径导入
root@vivesdata:/var/lib/ldap/cn=config/cn=schema# for i in $(ls);do slapadd -l "$i" -n 0;done; |
生成mysql数据对应的ldif文件并导入数据
生成数据对应的ldif
处理py文件代码如下
import pandas as pd |
批量运行的sh代码如下
#!/bin/bash |
批量导入ldif
将ldap复制到对应路径下
(base) win10@win10:~/ldap$ sudo cp -r /home/win10/ldap/ldif /home/win10/ldap/.data/var/lib/ldap/ |
单个导入ldif
ldapadd -x -D "cn=admin,dc=ldap,dc=vives,dc=be" -W -f data.ldif |
批量导入ldif
每个表需要输密码(用这个似乎不容易出错)
root@vivesdata:/var/lib/ldap# for f in ldif/*.ldif; do ldapadd -x -D "cn=admin,dc=ldap,dc=vives,dc=be" -W -f "$f"; done |
不需要输密码
root@vivesdata:/var/lib/ldap# for f in ldif/*.ldif; do ldapadd -x -D "cn=admin,dc=ldap,dc=vives,dc=be" -w "ldap" -f "$f"; done |